Friday, December 15, 2017

New for 2017: Potica Babies! An Old Favorite with a New Name


Last week, I had a sweet dilemma. Two holiday potluck parties in the space of three days:A musical gathering at the home of a Cajun music friend, followed by a Christmas party at San Francisco's Slovenian Hall. I wanted to bring a dessert that would work for both events.

I ruled out potica for two reasons. For one thing, I was pressed for time. But I also knew that our treasured celebration dish is often overlooked in a holiday buffet line of non-Slovenians. Is it too rich? Too plain? Too hard to categorize? I don't know. But I hate to see a half-finished loaf of potica languishing on a platter at the end of the evening. 

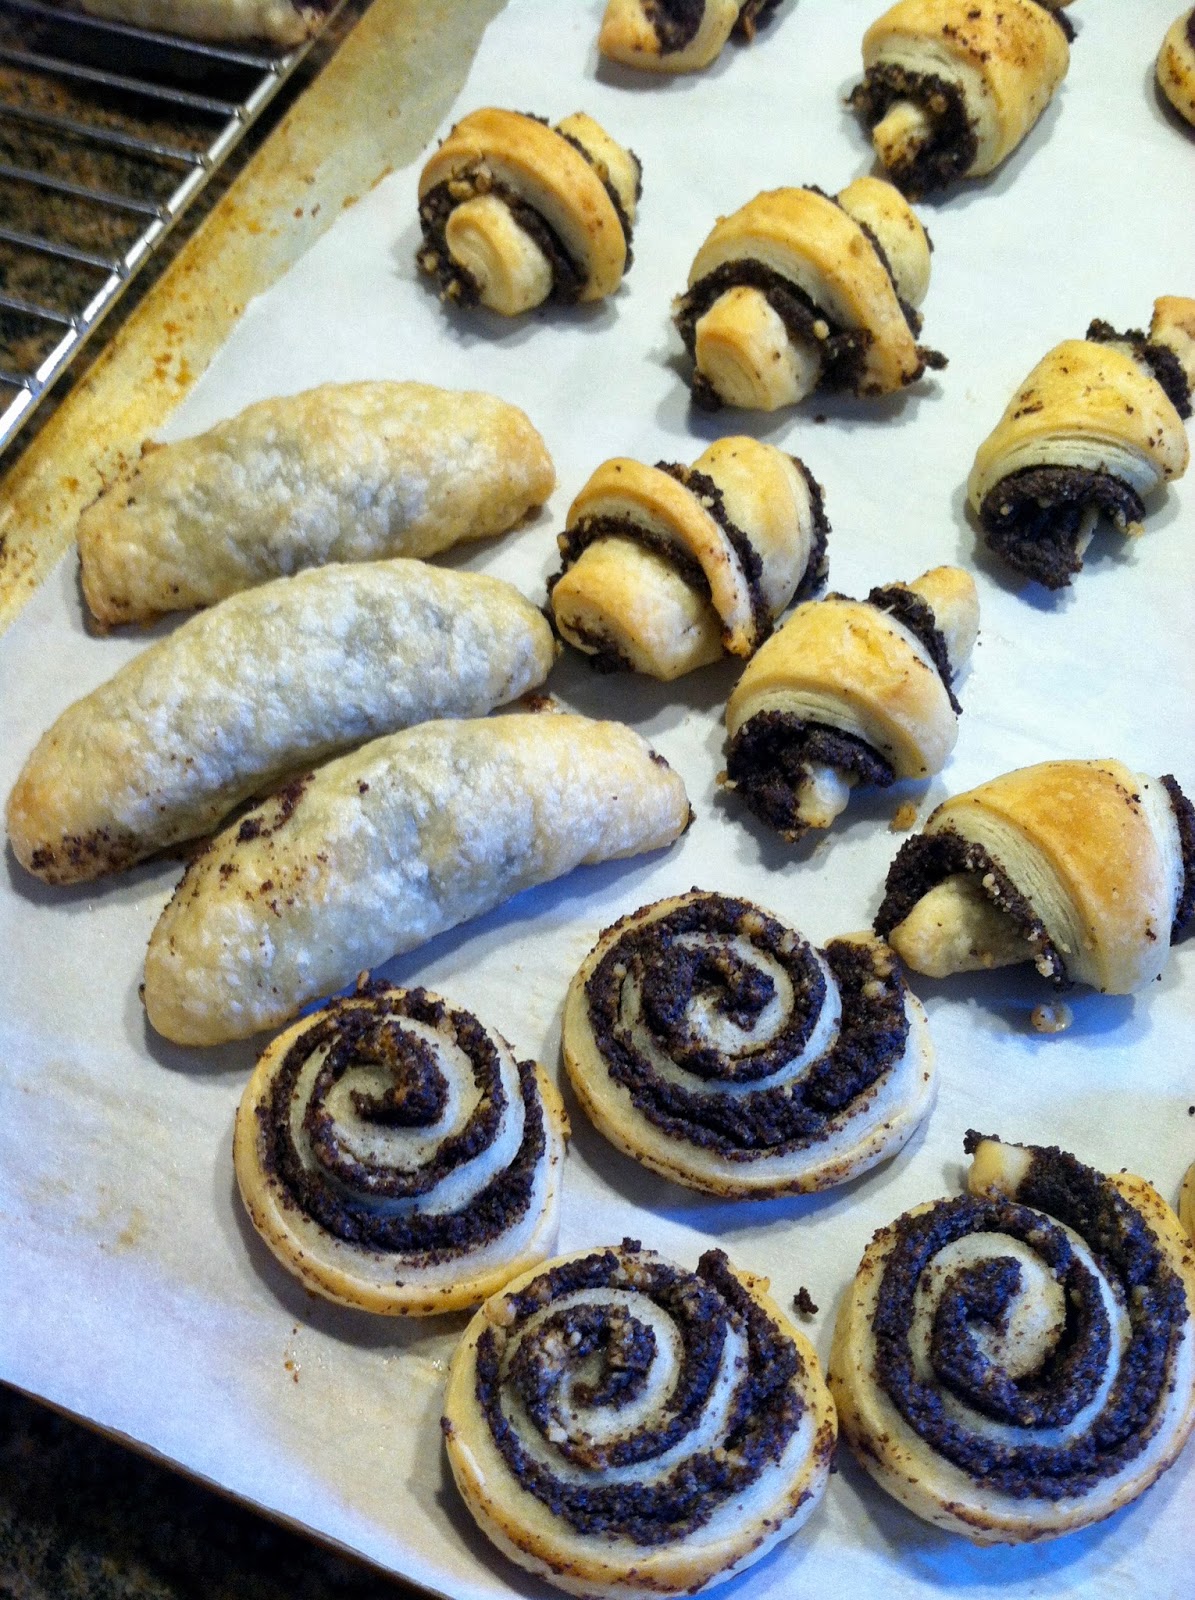
So I decided to make a holiday sweet I had wanted to tackle for awhile: A yeast-raised version of the ever-popular pastry/cookie you can see in the photos at the top of this page. These delicate filled creations go by a variety of names. But they are everywhere during the winter holidays. I thought it would be a good compromise, since I could use a walnut filling that would capture the flavor of potica.   

What do you call these tasty morsels? The proper Slovenian name, rogljički ("little horns") is challenging to say and spell, so many of my vintage cookbooks use one of the more familiar labels: kifli, kolache, or nut horns. (The popular Jewish version is known as rugelach.) 

This pastry originated in Central and Eastern Europe, with an enriched yeast dough as the foundation. But the version known to most Americans--artfully shaped cookies, often buried in confectioners' sugar--has a definite New World lineage. The key ingredient is cream cheese, an American invention. The recipe was introduced in 1939, in an inspired piece of World's Fair marketing by the Philadelphia Brand Cream Cheese company. 

(Tablet Magazine, a Jewish publication, tells the whole fascinating story here.

The ubiquitous cream cheese pastry is dense and rich: one part butter, one part cream cheese, two parts flour, often with eggs. Little or no sugar--and no leavening. I have used this style of pastry in several recipes on this blog: American Slovenian Nut Horns, made with cottage cheese instead of cream cheese. Baked Flancati, in which sour cream is added. And I have been making Jewish rugelach for years. 

But I had never tried the original European yeast-raised version. 

When I turned to my vintage Slovenian American cookbook collection, there was no shortage of recipes. Each cookbook had at least one. They were virtually identical: Butter, sour cream, egg yolks, yeast, and flour, in the proportions you will find in the recipe below. There were slight differences in the method of preparation. I stuck closely to the "Kifli (with yeast)" recipe in my newest old cookbook: Pots and Pans, from the Slovenian Women's Union of America. I liked the simplicity of the dough preparation, which was similar to making pie crust.  

I prepared two fillings, walnut and jam. Although I consulted my cookbooks, I ended up improvising. I wanted the walnut filling to taste like my family's potica, so I added honey and cinnamon. 

Somewhere along the way, it hit me: I was making little poticas! The walnut filling was the same, except for the addition of egg white. The refrigerated sour cream dough was almost identical to my family potica recipe--except for the absence of sugar. 

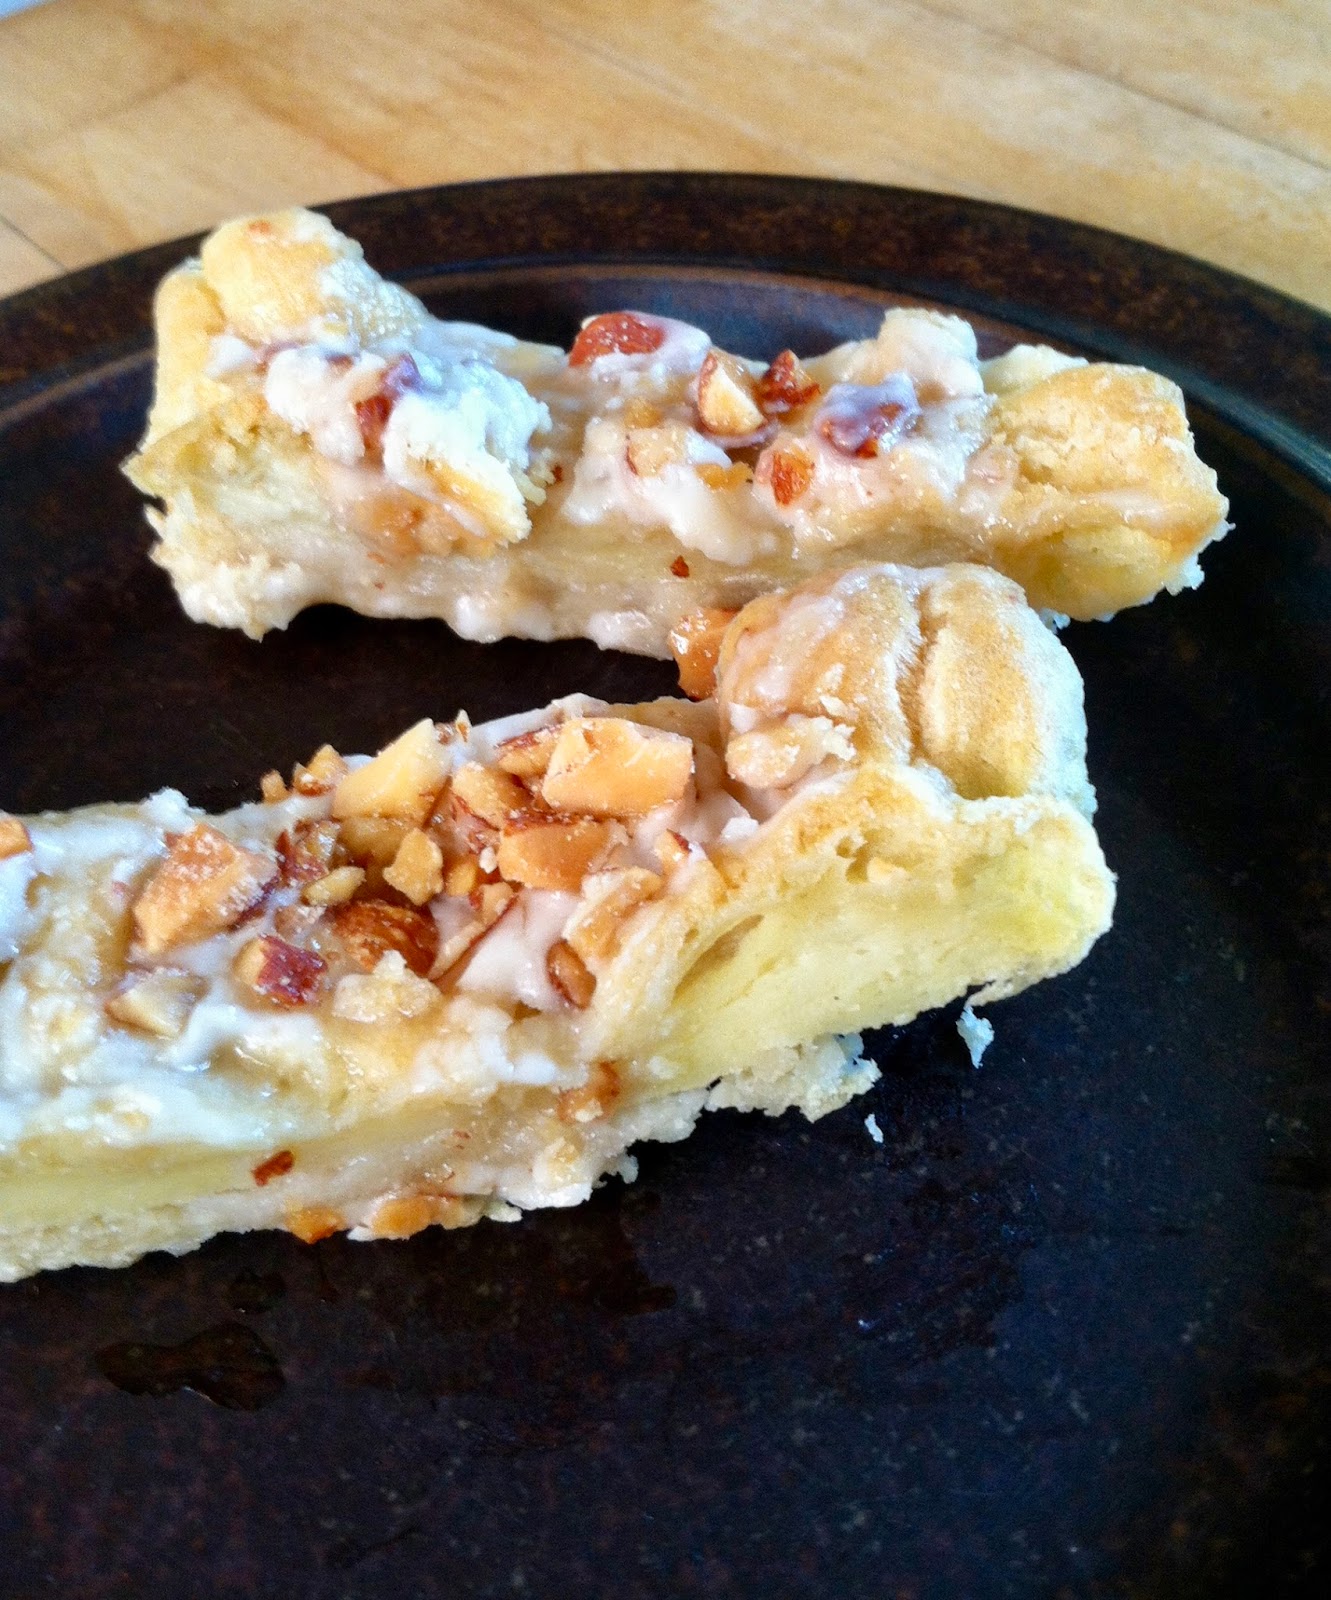
And when I cut into one of these little horns, it even looked like a potica: 


Well, all right. Maybe it looked more like the end of a potica, where there is more dough than filling. But this was clearly a miniature yeast bread. Rich, but not as rich as the butter-cream cheese version. It had the special scent and tang of a yeast-raised pastry. And, unlike potica, it could be served straight from the oven.

And best of all: There were no leftovers!

At the Cajun music party, these little horns disappeared in a half hour. Luckily, my accordion friend Mark, who makes kifli himself, managed to snag one. He even gave me a thumbs up!

Two days later, when my husband and I arrived at the Slovenian Hall, I was greeted by an anxious question: Had I brought potica? No, I admitted, not this time. I figured someone else would. But no luck. Not one of us had come through.

That's when I decided these little horns deserved two names: The proper Slovenian one, and one more. After checking on the spelling with Mia, my Slovenian teacher, I wrote out the label:

Rogljički--or Potica Babies.

Toward the end of the evening, I noticed that just three of these sweet babies remained on the tray. I quickly wrapped them up and slipped them to my teacher.

This recipe is a work in progress. But I think it's a keeper.

Vesel Božič! Merry Christmas! Happy Holidays to All!


Potica Babies: Rogljički ("little horns," yeast kifli)

4 cups all-purpose flour
1/2 teaspoon salt
2 packages dry yeast
1 cup butter
1 cup sour cream
4 egg yolks

confectioners' sugar for rolling
fillings (see below)


For the dough: Combine flour, salt and yeast in large bowl. Cut in butter until mixture is crumbly. Mix sour cream and egg yolks. Make a well in center of the large bowl and add the sour cream-egg mixture. Combine into a soft dough. Turn out onto lightly floured surface and knead for several minutes, until dough is smooth. Divide into 6-8 balls. Flatten into discs, wrap in plastic or waxed paper, and refrigerate for 1-2 hours or more.

Alternatives: Some recipes recommend dissolving yeast in a few tablespoons of warm water or milk before proceeding as above. Others treat the butter differently: softening it first, or even melting it in warmed sour cream, before adding the yeast. With any of these methods, the dough will take longer to chill.


To shape: Roll out each portion of dough onto a surface that is dusted with confectioners' sugar. To make the familiar crescent shape, roll each portion into an 8-9 inch circle and cut into 8-12 wedges. Place a rounded teaspoon of filling on the wide edge (see photo above) and roll up. Place on a parchment-lined cookie sheet with the narrow pointed end underneath. Bake at 375 degrees for about 20 minutes. Let cool, then dust with confectioners' sugar.

Other possible shapes: Roll into a rectangle, cut into diamonds, and pinch two points together to encase the filling. Or roll up the rectangle into one or two long rolls and cut into shorter lengths.


Walnut Filling (makes 1+ cup, enough for half the dough)

1 cup walnuts, ground
1/2 cup sugar
1 teaspoon cinnamon
2-3 tablespoons honey, if desired
1/2 teaspoon vanilla
1 egg white, unbeaten


Jam Filling (makes about 1+ cup, enough for half the dough)

1 cup jam or preserves (I used blueberry)
ground walnuts (enough to thicken)
cinnamon to taste
1 egg white, unbeaten


Other Filling Options: Any favorite potica filling should work. My homemade poppy seed filling would be a good choice. Be aware that too much egg or liquid can cause the filling to run or expand, especially if you use the open-ended "horn" shape.


Monday, November 20, 2017

Balkan-Inspired Cornbread with a Louisiana Twist


What does Balkan cooking have to do with Louisiana cornbread?

On the face of it, not much.

Except for this: It was my love for the Cajun accordion--and the Cajun and Creole music, food, and culture of Louisiana--that led me to a deeper appreciation of my own Slovenian heritage and to the even larger world of southeast Europe.

And cornbread happens to be popular in both places.

Then there was the practical reason: Yesterday, I needed to make a side dish for a big post-wedding celebration in our local Cajun-Creole music community. Cornbread seemed like the perfect addition. Naturally, I went back to my never-fail Balkan cornbread recipe as the foundation. My inspiration for that dish was a particularly moist "proja" recipe from Allison, an American blogger in Paris who got it from a Serbian friend. So I added my own little Cajun-Creole touches--and there you have it.

The changes were small ones. Some cut-up red pepper. A Cajun seasoning mix. And doubling the recipe, of course. Traditional cooking is a lot like playing folk music. A recipe, just like a tune, gets passed around, adapted, and expanded.

The recipe below did not disappoint, although it was a little on the mild side. Next time,  I might try to make it spicier. More of the seasoning mix, perhaps some diced hot peppers, or a few drops of hot sauce would give it even more Louisiana heat!

Enjoy!


Balkan-Inspired Cornbread with a Louisiana Twist

1-1/2 cups polenta or cornmeal
2/3 cup white flour
1 T Cajun seasoning mix (I used Slap Ya Mama)
(additional salt if seasoning mix doesn't include it)
6 eggs
1 cup oil
1-1/2 cups plus 3 T sparkling water
1-1/2 cups plain yogurt
2 cups feta cheese, cut into small cubes
1/2 cup chopped fresh parsley
1 red or green bell pepper, diced
1 cup corn kernels, fresh or frozen

To make it even spicier: Add more of the seasoning mix, some diced hot peppers, or some Louisiana hot sauce!


Oil two 8-inch cast iron skillets, two small ceramic dishes, or one large rectangular ceramic dish (at least 9" x 13"). Sprinkle with a little cornmeal.

Combine cornmeal, flour, salt and seasonings in a large bowl. In a medium bowl mix eggs, oil and sparkling water. Add these wet ingredients to the dry ingredients and stir well. Add yogurt and stir. Mix in feta cheese cubes, parsley, red pepper, and corn. Pour batter into the prepared pan.

Bake at 350 degrees for 50 to 60 minutes until golden brown. Serve warm.


Saturday, August 5, 2017

First Date Potica, Beginnings and Endings (and a short cut version)


Recently, I learned a new family story. My grandmother's potica helped launch my parents' courtship.

My parents met on a YMCA-sponsored bike hike the summer before they entered the same Cleveland high school. Their tale of love at first sight was part of our family lore for as long as I can remember. But I never knew the date of the momentous event--or about the potica--until I starting reading my parent's old World War II love letters.

My parents wrote almost every day of their three-year separation. The memory of that first date was so important that they acknowledged it every month when the day rolled around, at least during their wartime correspondence. They always exchanged anniversary greetings and often reminisced. So that's how I learned the full story.

My parents, early 1940s, Cleveland,
with my father home on leave
I found the most detailed account in one of my mother's letters, written on what she referred to as their sixth anniversary. After the group bike outing, she had invited the cute boy with the curly hair, along with a couple of his friends, back to the modest home her family shared with the landlord and his kids in a mostly-Slovenian neighborhood called Collinwood.

My grandmother welcomed her daughter's new friends. To sweeten the deal, she held out the promise of refreshments: soft drinks and a taste of the potica she was making.

Those teenage boys agreed to wait around for potica? I started to imagine my clever grandma laughing in the kitchen! Now she could be certain the young people would remain under her watchful eye for at least a few hours--or longer, depending on where she was in the potica process. No Slovenian boy would have fallen for that trick. But my father was Scottish. For all he knew, she might have been whipping up a quick batch of scones.

Hours later, my parents still sat in the living room, completely smitten. They talked all night long, while my father's captive buddies waited patiently. At some point, there was even some potica.

When did my grandmother start working on that potica? If only I had learned the story a year earlier, I could have asked my mother. But now she was too diminished, in body and in mind, to have any kind of extended conversation.

My parents' wedding, 1946
with my Slovenian grandmother at far left

Potica will never be a spur-of-the-moment treat. But this sweet story raises a  good question: How quickly could my grandmother (or anyone) turn out a potica? Are there shortcuts that save time but don't compromise the final product?

I would answer with a qualified yes.

My family recipe (that's the original copy below) is actually easier than most, because of the simple layered filling and the make-ahead yeast dough. But it does require advance planning, because the dough is supposed to rest in the refrigerator overnight before rolling and filling.

My mother's original potica recipe

But what does "overnight" mean? An equivalent stretch during daylight hours should work just as well, but are the full eight hours really necessary? After all, the dough never rises much in the refrigerator.

Once before, I had taken a chance with a shorter daytime rise, when I decided at the last minute to make potica for an evening social gathering. The details were hazy, but I thought the loaves were a little flatter than usual.

Two months ago, I tried once again to make potica in a single day. This time, the occasion was a sad one. The husband of Mia, our wonderful Slovenian teacher at San Francisco's Slovenian Hall, had died unexpectedly. France Rode, a prominent engineer and inventor, had been a much-loved figure in the community. I wanted to bring potica to the gathering that would follow his memorial service.


In theory, I did have the full weekend before the memorial service to make potica. With better planning, it would have worked. But I was out of everything but yeast --and I wanted to visit my ailing mother on Saturday afternoon. Once we got home, I wasn't in the mood for grocery shopping, much less a post-dinner dough preparation.

So that left Sunday. A single day to shop, make the dough, let it rest in the refrigerator, hand-grind the walnuts, and then fill and bake the loaves.

The day began with a morning walk to the corner market and ended twelve hours later with the covered loaves cooling on a rack, while I toddled off to bed.

Yes, it can be done. It was a full day. But it also felt like a kind of mindfulness practice.

I sampled the potica the next night, when some of my fellow students gathered at my house. It tasted fine. I took most of it to the memorial later in the week and froze the rest to take to our final Slovenian class the following week, for our annual end-of-term celebration.

That final class was bittersweet. As always, there were visitors, musicians, food and drink, and student presentations. But France Rode's absence was felt by everyone.

When my turn came to present, I talked about my family history. I told the story of that "first date" potica-- including the key detail I had learned just that morning, when I re-read my mother's letter.

I had just learned that today was the anniversary of that long-ago meeting when my parents started talking and, fortified by my grandmother's potica, never stopped: June 19, 1938. And now I was honoring it myself, for the first time, in a time and place that felt just right.

For Slovenians, potica always seems to be there at the important moments. For times of sadness and times of celebration. To mark beginnings and endings. It's part of who we are.


A few tips about "shortcut" potica with my family recipe

Aside from the obvious--shop in advance, start early--there is just one significant way to make a faster version of my family's traditional recipe, which normally calls for an overnight rise in the refrigerator.

If necessary, you can make the potica in one day rather than two by reducing the time the dough chills in the refrigerator. The family recipe does work as long as the rich yeast dough (which includes melted butter and sour cream) is completely chilled before rolling it out.

To prepare (and chill) the dough as quickly as possible: Pour the melted butter into a room temperature bowl and let it reach a cool, semi-liquid state before mixing it with the other liquid ingredients to make the dough.

Prepare the dough as usual. Wrap and chill.

I found that three hours in the refrigerator may be sufficient, although five hours was better. The five hour loaf (shown in the photo at the top of the page) rose a little more and held its shape better than the three hour version.

A slightly denser loaf is a small sacrifice if the alternative is to have no potica at all. And my family's style of potica (rich, thin layers, flattish loaves) is closer to baklava than a light, airy yeast bread. Most importantly, the intoxicating flavor and aroma remain the same, even with this small shortcut.


Friday, June 23, 2017

Pierogi Lasagna Update, with Mushrooms and Farmer Cheese


My first version of pierogi lasagna was based on a recipe from the website of Alice Kuhar, a Slovenian American radio personality in Cleveland. Before then, I had never heard of this popular American hybrid.

Lasagna is really a misnomer, because the dish is essentially a casserole version of the popular Eastern European dumplings known as pierogi--or, if you are Slovenian, žlikrofi.

Lasagna with a potato-cheese filling turned out to be much tastier than I imagined. But it is an admittedly heavy dish, more suitable as a side than a main course. A few months ago, I set out to make it lighter. More protein, fewer carbs, and meat-free.

It occurred to me to use some farmer cheese in the filling. A quick online search showed that someone else already had this brainstorm: Cleveland's celebrity chef Michael Symon. Like me, he is of half Eastern European heritage and has family roots in Johnstown, PA, where my own immigrant ancestors once lived.

Symon's recipe looked tasty--and ambitious, since he makes his noodles from scratch. But it was even richer than my original version, with a full pound of bacon and some some heavy cream added to the mix.

I went back to my original recipe and made a few changes. I skipped the bacon and used sautéed mushrooms instead. I added a layer of farmer cheese and cut down on the potatoes. Since my husband was getting over the flu, I used a lighter hand with the seasonings: less garlic and onions, and no chives or marjoram.

The result? Delicious! Lighter, protein-rich, but still in the Eastern European spirit. Comfort food. It is also an easy make-ahead dish, especially if you use no-boil lasagna noodles. Details follow.

Enjoy!


Pierogi Lasagna with Mushrooms and Farmer Cheese

1-2 small onions, diced
1-2 cloves garlic, minced
6 ounces mushrooms, sliced
a little wine, if desired
1-1/4 pounds potatoes. mashed
1 c. grated sharp cheese (I used cheddar)
¼ cup milk or sour cream
salt and pepper to taste
1-2 teaspoons fresh chives, minced (optional)
1-2 teaspoons fresh  marjoram, minced (optional)
1 pound farmer cheese

lasagna noodles (I prefer oven-bake style)
sour cream (optional) for top
grated parmesan cheese for top


Dice onions. Brown in olive oil until almost carmelized. Set aside. Brown garlic and mushrooms in olive oil. Season with salt and pepper. Add a little wine, if desired. Set aside.

Wash and halve the potatoes, leaving skins on. Cook in boiling salted water until tender.  Drain. Be sure to save the potato water. Allow to cool slightly, then mash, adding a little potato water if needed.

Combine the mashed potatoes, onions, garlic-mushroom mixture, grated cheese, milk or sour cream, and seasonings. If needed, add more liquid to make filling spreadable. Taste and adjust seasonings. Under most circumstances, this tastes best when the filling is highly seasoned.

If lasagna noodes require pre-cooking, prepare according to package directions. I prefer to use no-boil lasagna noodles. You will need about ¾ pound.

Oil a 9 x 9 inch casserole dish. Place first layer of noodles on bottom. Spread with 1/3 of potato mixture, topped by 1/3 of farmer cheese, crumbled or dropped in spoonfuls. Add another layer of noodles and repeat, for a total of 4 layers of noodles and 3 layers of filling, beginning and ending with noodles. Top with a thin layer of sour cream., if desired, and a sprinkle of  parmesan cheese and chives.

The dish can be refrigerated, covered, until baking. If lasagna appears too dry after refrigerating, pierce noodles with a sharp knife and add some of the reserved potato water. Bake at 350 degrees for 40-45 minutes. Cover with foil if top becomes too brown.

Let cool for about fifteen minutes and cut into squares to serve.


Wednesday, May 24, 2017

Potica Is Not Pizza: A Papal Joke and a Culinary Lesson, thanks to President Trump

Pizza, from Wikipedia


I try to steer clear of politics in this blog, but it is impossible to resist this breaking news story. 

During his historic visit to the Vatican, the stocky President Trump was subject to a little gentle teasing by Pope Francis and the First Lady. 

During a cordial exchange, the Pope asked the Slovenian-born Melania:  "What are you feeding him? Potica?"  

Melania replied with a smile: "Yes, potica." 

Apparently, some of the news sources misunderstood this as a reference to pizza, which might be Italy's most famous culinary export.  

The New York Daily News has a full and accurate report of this gaffe, which was not (for once) the fault of President Trump. 

So, just for the record: Pizza has no connection to potica, beyond the obvious: Both are treasured national dishes that use yeast dough as a base. But otherwise, the differences are pronounced.

Potica is rolled and filled. The dough is rich and the filling is usually (but not always) sweet. It is an elaborate creation that is normally reserved for holidays and other celebrations. Pizza is flat, just a simple yeast dough covered with a savory topping. It is an everyday dish that probably began as a quick way to use leftover bread dough. 

Pizza looks like that tasty photo at the top of the page. Potica looks like this: 


Homemade Walnut-Honey Potica, from Blair K's kitchen


Pretty hard to confuse the two dishes, no?

But here is the likely source of the confusion: Italy and Slovenia share a border. In the border regions, there is a blending of both food and language. The rich, rolled yeast pastry/bread that is called potica in Slovenia (where it originated) is called "putizza" in Italian. So the meaning probably just got lost--or tangled--in translation. Potica/putizza morphed into pizza. But it's not.

The most famous Italian version of this shared dish is called putizza di noci. It is a specialty of Trieste, a cosmopolitan port city that is now part of Italy but was previously within the borders of the former Yugoslavia. There is a particularly delicious version of putizza filled with chocolate and nuts that is also a holiday dish in the Jewish community of Trieste. That is how I discovered this fascinating culinary overlap across three cultures.

If you would like to try your hand at the chocolate-filled Trieste version of putizza (or just want to learn more) see my previous post:


In the photo below, the putizza di noci slices are on the left and the potica slices are on the right. They look very much the same. But you would never confuse either one with pizza!


Left: Putizza di Noci with chocolate-walnut filling.
Right: Potica with almond-honey (top) and poppyseed filling (bottom)
From Blair K's kitchen 


Saturday, April 15, 2017

Eggs Dyed with Onion Skins for Easter (and Passover)


Last spring, I discovered Slovenian Easter eggs or pirhi. Until then, I had just one Slovenian Easter tradition: Potica.

My Slovenian language teacher piqued my interest, when she gave each of us a "pisanica." These hollowed-out, intricately decorated black-and-red eggs are a traditional folk art that is practiced in Bela Krajina, a region in southeast Slovenia. Similar styles of egg decorating are found in other parts of the country.
That first beautiful egg (in the upper left in the photo above) inspired me to experiment with another  technique I read about, using hard-cooked eggs and homemade dyes from natural ingredients. This is a tradition in Slovenia and many other Slavic cultures. It is also a Jewish custom at Passover. I decided to start with boiled onion skins, the best known natural dye.

My eggs turned out beautifully. They were a deep russet color, with delicate white markings created by binding small leaves to the eggs before dyeing. I gave one to my teacher, who told me that her family in Slovenia had made Easter eggs exactly the same way. I posted the photo above in my blog and promised to follow up with detailed instructions in a later post.

I did not intend to wait a full year!

But here we are. In the middle of Passover week, with Easter just a few days away.

My procrastination paid off. This year, when I decided to make the onion skin eggs again, I ended up using an even simpler method. And it worked just fine.

The Internet offers a variety of methods for coloring eggs with onion skins and other natural dyes. Even Martha Stewart has some good suggestions! Some people suggest making the dye beforehand, by boiling the onion skins and draining the liquid, and then soaking the hard-cooked eggs. That is what I did last year. Others recommend the one-step approach: putting everything in the pot--onion skins, eggs, water--and simmering away.

This year, I used the one-step approach. It is certainly easier. But I had another motivation. With Passover and Easter overlapping this year, I wanted a dish that would satisfy both our family traditions. So I decided to incorporate the approach used in making huevos haminados ("baked eggs"), a dish that originated with Jews from the Sephardic (Spanish) tradition. I had made it some years earlier, minus the decorative leaves and flowers.

For the Jewish dish, you add a little seasoning and cook the eggs with the onion skins (and sometimes whole onions) for many hours. Sometimes the eggs are left to sit overnight in the oven, at very low heat, especially if they are being prepared for the Sabbath. This extended cooking is supposed to add a brownish color on the inside, as well as a subtle nutty flavor and a creamy texture. Another twist: When the eggs are peeled, they often have a lovely marbelized pattern, because the shell has cracked during that long cooking. In fact, sometimes the shell is cracked intentionally, in order to create that marbleized effect.

In the photo below, you can see what this year's eggs looked like: peeled, in the shell, and sliced. Served with matzo, as we did for one of our Passover dinners, the eggs become huevos haminados!  
Huevos Haminados
A couple of other differences this year: I did not hard-boil the eggs before dyeing, and I used brown onion skins rather than red.

As far as I can tell, it didn't make much difference. Once again, the eggs were beautiful. In the recipe below, I suggest following the one-step method. This is easier and it is supposed to allow for better penetration of the dye. If you are nervous about wrapping and tying those fragile raw eggs, you can always hard-cook them first.

My preference for the one-step method seems to be supported by this charming video from a Slovenian newspaper in Cleveland, which features a nimble-fingered older woman and polka music in the background.

Happy Holidays!


Eggs Dyed with Onion Skins

1 dozen white eggs
small leaves, herbs, and flowers for decoration
6 to 10 cups of brown or red onion skins
white vinegar, about 4 tablespoons
oil, about 2 tablespoons
salt and peppercorns, 1 to 2 tablespoons each, if desired
water, equal in volume to onion skins
old pantyhose (or cheesecloth)
string or twist ties, if desired

First, prepare the eggs: If desired, rinse the eggs and wipe dry. To follow the recommended one-step method below, leave the eggs uncooked. (If you plan to use the alternative method, hard cook and cool the eggs before decorating.) Select small leaves and flowers for decoration. Sprigs of standard kitchen herbs like parsley, dill, cilantro, mint and even carrot tops work just fine. Wet a few leaves and press onto each egg. To hold decorations in place, wrap the egg  firmly in a piece of old pantyhose (or cheesecloth) and fasten the end by knotting, or by using string or twist ties. 

Recommended one-step method of dyeing:

If onion skins are dirty, rinse them briefly and drain. Fill a large pot (like a Dutch oven) with water. Add the onion skins, vinegar, plus salt and pepper, if desired. Bring to a boil and then lower the heat. Carefully lower the prepared eggs into the liquid. Pour oil over the top of the water. Cover the pot and simmer for at least an hour--or longer, for a deeper color. Check the color of the eggs periodically. If you want to make huevos haminados, or simply want an intense color, you should simmer for 3 or 4 hours and/or leave the eggs overnight in the pot of onion skins and water.

Alternative method, with eggs and dye prepared separately: Hard cook the eggs and let cool to room temperature. Add decorations and prepare as above. Next, prepare the dye. Boil onion skins in an equal amount of water for about 15 minutes. Strain the liquid. Add 1 tablespoon of vinegar for each cup of liquid. Carefully submerge the prepared eggs in the warm dye. Let eggs and dye cool to room temperature, then refrigerate overnight.

Final Step: When you like the color of the eggs (and when they are cool!) carefully remove them from the pot. Unwrap, rinse, and let drain. When dry, rub with oil to provide a nice sheen. Enjoy!


Thursday, April 13, 2017

O Canada! Passover Mandelbrot from Toronto


When I went looking for a Passover mandelbrot recipe, I didn't expect to end up in Canada. But that is where I landed. At a recipe featured in the pages of The Toronto Star.

Why was I surprised? Canada is a multicultural society that rivals the United States in its inclusiveness. That point was driven home during a couple of recent visits I made to the Canadian Consulate in San Francisco. (That's where I got that nice maple leaf pin in the photo.)

Naturally, all the signs at the Consulate were in French and English. But it was more than just that. The Consul General is Asian. The man at the front desk had African heritage. The documents I needed were notarized by a woman with the familiar lilt of Eastern Europe in her voice. Meanwhile, a woman in a hijab and her husband were planning a trip and needed help with a visa. Canadians, each and every one.

Back to cooking!

Passover desserts are notoriously challenging, because conventional flour and leavening are prohibited. I particularly love mandelbrot, a traditional Jewish sweet that is a close cousin to Italian biscotti and Slovenian domaci prijatelj. I was pretty happy with the Passover version I'd adopted some years ago, made with matzo cake meal and potato starch, generously lightened with eggs. But it called for butter. This year, I wanted to find a recipe that used oil. It was mostly for reasons of health and convenience, but also because a butter-free version could be served with both meat and dairy meals.

The Passover mandelbrot recipe in the Toronto Star looked similar to the one I had been using. It turned out to be even easier to work with, probably because of the suggestion that the dough should be chilled for an hour before shaping. I made just a few small changes in the flavoring and add-ins, as indicated below. It came out firm, crisp, and tasty.

In fact, you might not even guess it is a Passover dessert.

And if you decide to call it a Slovenian domestic friend, no one will be the wiser! 


Passover Mandelbrot (Adapted from The Toronto Star)

1-1/2 cups matzo cake meal*
6 tablespoons potato starch
dash of salt
1/4 teaspoon cinnamon
3 large eggs
1 cup light brown sugar
1/2 cup oil
1/2 teaspoon vanilla extract
1/4 teaspoon almond extract
1/2 cup chopped walnuts (or almonds)
2/3 cup chocolate chips
additional sugar and cinnamon for topping

* If you can't find matzo cake meal, grind regular matzo meal in a blender until fine.

(To follow the original recipe: Use white sugar, the grated zest of an orange and almonds instead of walnuts; skip the chocolate chips, cinnamon, and almond extract.)


Sift dry ingredients into a bowl and set aside. Beat oil and sugar then add eggs one at a time, beating until light. Add vanilla and almond extracts. Stir in dry ingredients. Fold in nuts and chocolate chips. Mixture will be soft and sticky. Cover and refrigerate for an hour or more.

Divide chilled dough into two portions. Dust a flat surface with matzo cake meal and roll each portion into a fourteen inch log. Place each log on a parchment lined baking sheet and flatten so it is about 2 inches wide. Top with cinnamon-sugar mixture.

Bake at 350 degrees F for 30 minutes or until brown. Remove from oven and let cool slightly. Using a serrated knife, cut into 1/2 inch slices. Place cut side down on baking sheet and bake for 8-10 minutes. Turn over and bake for 8-10 minutes more. Let cool.

Friday, February 24, 2017

Danish Puff, Comfort Food from the Vault


I wish I could claim that Danish Puff, a homey but elegant childhood favorite, has Slovenian roots. But perhaps it is enough to say that it was inspired by memories of my mother.

This is another recipe that turned up in the green metal recipe box my mother passed along to me about six months ago. Even though I had a copy in my own card file, I hadn't thought about it in years. I had never considered resurrecting it. Concoctions like Danish Puff belonged in the category of laughable culinary faux-elegance from the 1950s, or so I thought. At best, it was nostalgic comfort food.


But back in the I fall, I was feeling nostalgic--and in need of some comfort. My mother's health was declining and we were helping her downsize and move into a smaller place, where she would receive more help. The upcoming elections didn't help. So I made Danish Puff for the first time in at least thirty years. I even shared some with my mother--on moving day. She seemed to enjoy it.

Setting aside my culinary snobbery, I was forced to admit the truth: Danish Puff is a simple pastry that tastes wonderful. Perhaps it no longer seems quite so exotic and vaguely European, but it is well worth making.

Perhaps you remember it from your own childhood.

It is a simple but elegant affair. Two contrasting pastry layers, the bottom one a standard shortcrust pastry and the top one a cream puff dough. Or, to be fancy and French, paté brisée topped by paté choux. Shaped into long double decker loaves, baked and sliced. The only sweetness comes from the drizzle of confectioners' sugar icing, topped by almonds. The haunting flavor of almond runs through every mouthful.

The source of my mother's handwritten recipe is hard to determine. In fact, the card I discovered in her file was a hybrid--a yellowing card in two sets of handwriting, hers and mine:


There are virtually identical recipes for Danish Puff in two of my vintage Slovenian American cookbooks--including my favorite one (from both the culinary and political standpoint), compiled by the Progressive Slovene Women of America. Their version is just like my mother's, with the no-frills icing that is nothing more than confectioners' sugar mixed with a little water or milk, plus a touch of almond extract:


But that doesn't make a strong case for its Slovenian origins, since the same recipe can be found in so many other places. Including the blogosphere, where it seems to have enjoyed a resurgence in popularity. Everyone's mother or grandmother seems to have made it. Many sources attribute the recipe to a Betty Crocker cookbook from the 1960s (but I know it is older than that) or perhaps the 1950s.

Did Betty Crocker, America's favorite invented home cook, create this recipe?

That seems doubtful.

I am more inclined to trust the opinion of Beatrice Ojakangas, a noted cooking authority (and prolific cookbook author) from Minnesota, whose own background is Finnish. She includes a recipe for Danish Puff in Great Old-Fashioned American Desserts (U. Press of Minnesota, 2004). She describes it as a traditional coffee-and-dessert favorite of Scandinavian Americans, although, as she drily notes, it is "unknown in Denmark."

The recipe follows below. It is so similar to all the other recipes for Danish Puff (except for a few non-almond variations) that I do wonder whether there might have been a single source. Perhaps it first made the rounds when it was printed on bags of General Mills flour.

But why worry about the source? Try it and enjoy it for yourself!


Danish Puff

Bottom Layer:

1/2 cup butter
1 cup flour
2 tablespoons water

Top Layer:

1/2 cup butter
1 cup water
1 cup flour
3 eggs
1 teaspoon almond extract

Icing:

confectioners' sugar, 1/2 to 1 cup
a little water or milk to thin
almond extract to taste
chopped or slivered almonds

Note: Some recipes suggest vanilla extract and walnuts as alternatives. But that's not how my mother made it--and I believe it changes the character of the pastry.


Bottom Layer: Cut butter into flour as for pie crust. Sprinkle with water and mix lightly. Form into a ball and divide in two. Pat each half into a 3 x 12 inch strip on an ungreased baking sheet.

Top Layer: Combine butter and water in a saucepan and bring to a boil. Remove from heat. Add flour and mix in quickly to keep mixture from clumping. (Some recipes suggest cooking the mixture briefly over the heat.) Add eggs one at a time and beat well after each addition. Add flavoring and beat until smooth. Divide mixture in half and spread on each pastry strip.

Bake at 350 degrees F for 45 to 60 minutes or until lightly browned. Let cool. Frost with a simple confectioners' sugar icing. Sprinkle with nuts. Slice and serve. Tastes best shortly after baking. If there is any left over, refrigerate uncovered.


Monday, January 9, 2017

At last: Homemade Poppy Seed Filling


Poppy seed filling may be an acquired taste, but I have always loved the assertive, slightly musky flavor. I associate it with Christmas. Of course, I did grow up in Cleveland, an ethnic town that was home to many people with Eastern European heritage.

I never did associate poppy seed filling with potica. (The very idea would have been sacrilege in my family!) I was most accustomed to it in Danish pastries and in those delicate filled cookie-pastries like the ones at the top of the page. (I'll be posting that recipe soon.) Those rich little cookies go by many different names: Kifles. Kolache. Nut Horns. The Jewish version is called rugelach.

When I began to explore Slovenian cooking, I rediscovered poppy seed filling. I used it in prekmurska gibanica and even in potica. But I always relied on the familiar canned version, doctored up with a few flavor enhancements. It tasted just fine.


This year, I decided to make my own. It was a little daunting, because I had read that the poppy seeds needed to be ground--and that a food processor or a blender wouldn't do the trick. The ideal solution was a special grinder imported from Europe, but that seemed impractical--and expensive.

An electric coffee grinder might work, according to some sources, but only if the poppy seeds were ground in small batches. I decided to give that a try.

I found a number of recipes in my Slovenian cookbooks. I finally settled on a potica filling recipe I found online from a Slovenian source. It was an all-purpose recipe, using either walnuts or poppy seeds. I cut it down by half, modified it just a little, and made it twice, in both a regular and a vegan version. Both were tasty, although the first time I didn't grind the poppy seeds long enough.

My grinder worked best when I processed no more than 1/3 cup of seeds at a time for a full minute. During grinding, the seeds begin to clump together and the color changes from blackish-blue to brownish-gray. The end product should "look and feel like wet sand." You can see the before-and-after photos below.


The recipe below makes about two cups of filling. Plenty for a single batch of cookies. For a big batch of potica, you will probably need more--especially if you love the taste of poppy seeds!

Enjoy!


Poppy Seed Filling

250 g poppy seeds (8 oz or 1-1/2 cups)
50 g sugar (1/3 cup)
50 g honey (2-1/2 tablespoons)
50 ml milk (4 T) to start (may need up to 3/4 cup)
1 tablespoon butter
1 egg (can be omitted)
1/2 tablespoon cinnamon
1/2 teaspoon cloves (or more)
2 tablespoons rum (or other spirits)
1/2 tablespoon vanilla
grated rind of 1 lemon

Rinse seeds and drain. (This may be an optional step.) Grind them in small batches in coffee grinder for about a minute. The resulting mixture should look and feel like damp sand.

Melt honey and butter in milk, add sugar, and stir till dissolved. Add poppy seeds and stir. Simmer for a few minutes, adding more milk if needed. Take off stove. Beat egg with rum, then stir it in gradually so the filling doesn't curdle. Add other flavorings. Add more liquid if needed and continue to simmer till thick. (Don't overdo this--it thickens as it cools.)

The vegan almond version: use almond milk and vegan butter, date or agave syrup instead of honey, and 3 tablespoons aquafaba or other egg substitute.  Flavor with amaretto instead of rum.

Makes about 2 cups.


For Poppy Seed Potica:

Follow the directions for preparing and shaping the dough from my family recipe, or from my gluten-free or vegan adaptations. Brush the rolled-out dough with melted butter (or dairy-free substitute) as directed and then spread it with the poppy seed filling. If filling seems too thick, add additional milk or spirits. This recipe probably makes enough filling for half the loaves in the standard recipe, or for the full recipe in the smaller gluten-free and vegan versions. But it's hard to judge (it depends on how thinly you roll the dough and how much you like poppy seeds!) so when in doubt make extra. Some recipes suggest adding chopped walnuts or raisins, which makes a nice addition and will stretch the filling.