
Last spring, I discovered Slovenian Easter eggs or pirhi. Until then, I had just one Slovenian Easter tradition: Potica.
My Slovenian language teacher piqued my interest, when she gave each of us a "pisanica." These hollowed-out, intricately decorated black-and-red eggs are a traditional folk art that is practiced in Bela Krajina, a region in southeast Slovenia. Similar styles of egg decorating are found in other parts of the country.

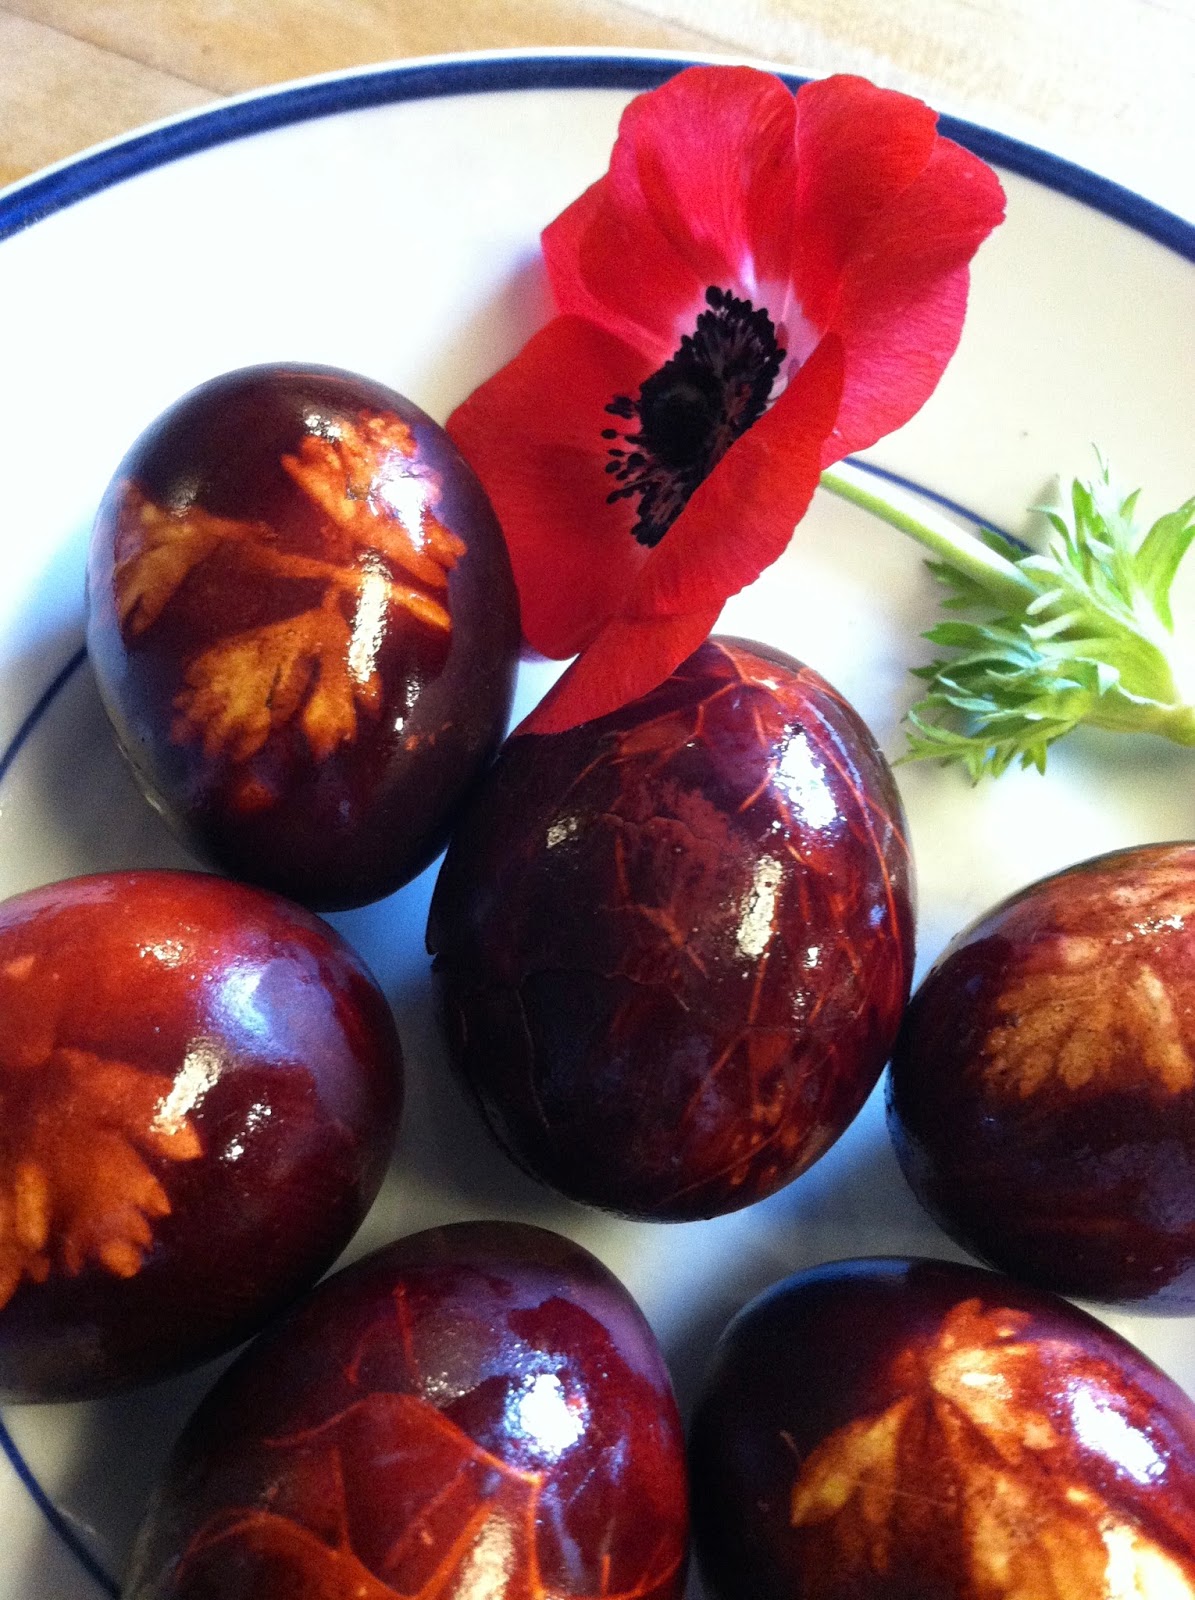
My eggs turned out beautifully. They were a deep russet color, with delicate white markings created by binding small leaves to the eggs before dyeing. I gave one to my teacher, who told me that her family in Slovenia had made Easter eggs exactly the same way. I posted the photo above in my blog and promised to follow up with detailed instructions in a later post.
I did not intend to wait a full year!
But here we are. In the middle of Passover week, with Easter just a few days away.
My procrastination paid off. This year, when I decided to make the onion skin eggs again, I ended up using an even simpler method. And it worked just fine.
The Internet offers a variety of methods for coloring eggs with onion skins and other natural dyes. Even Martha Stewart has some good suggestions! Some people suggest making the dye beforehand, by boiling the onion skins and draining the liquid, and then soaking the hard-cooked eggs. That is what I did last year. Others recommend the one-step approach: putting everything in the pot--onion skins, eggs, water--and simmering away.
This year, I used the one-step approach. It is certainly easier. But I had another motivation. With Passover and Easter overlapping this year, I wanted a dish that would satisfy both our family traditions. So I decided to incorporate the approach used in making huevos haminados ("baked eggs"), a dish that originated with Jews from the Sephardic (Spanish) tradition. I had made it some years earlier, minus the decorative leaves and flowers.
For the Jewish dish, you add a little seasoning and cook the eggs with the onion skins (and sometimes whole onions) for many hours. Sometimes the eggs are left to sit overnight in the oven, at very low heat, especially if they are being prepared for the Sabbath. This extended cooking is supposed to add a brownish color on the inside, as well as a subtle nutty flavor and a creamy texture. Another twist: When the eggs are peeled, they often have a lovely marbelized pattern, because the shell has cracked during that long cooking. In fact, sometimes the shell is cracked intentionally, in order to create that marbleized effect.
In the photo below, you can see what this year's eggs looked like: peeled, in the shell, and sliced. Served with matzo, as we did for one of our Passover dinners, the eggs become huevos haminados!
 |
| Huevos Haminados |
As far as I can tell, it didn't make much difference. Once again, the eggs were beautiful. In the recipe below, I suggest following the one-step method. This is easier and it is supposed to allow for better penetration of the dye. If you are nervous about wrapping and tying those fragile raw eggs, you can always hard-cook them first.
My preference for the one-step method seems to be supported by this charming video from a Slovenian newspaper in Cleveland, which features a nimble-fingered older woman and polka music in the background.
Happy Holidays!


Eggs Dyed with Onion Skins
1 dozen white eggs
small leaves, herbs, and flowers for decoration
6 to 10 cups of brown or red onion skins
white vinegar, about 4 tablespoons
oil, about 2 tablespoons
salt and peppercorns, 1 to 2 tablespoons each, if desired
water, equal in volume to onion skins
old pantyhose (or cheesecloth)
string or twist ties, if desired
First, prepare the eggs: If desired, rinse the eggs and wipe dry. To follow the recommended one-step method below, leave the eggs uncooked. (If you plan to use the alternative method, hard cook and cool the eggs before decorating.) Select small leaves and flowers for decoration. Sprigs of standard kitchen herbs like parsley, dill, cilantro, mint and even carrot tops work just fine. Wet a few leaves and press onto each egg. To hold decorations in place, wrap the egg firmly in a piece of old pantyhose (or cheesecloth) and fasten the end by knotting, or by using string or twist ties.
Recommended one-step method of dyeing:
If onion skins are dirty, rinse them briefly and drain. Fill a large pot (like a Dutch oven) with water. Add the onion skins, vinegar, plus salt and pepper, if desired. Bring to a boil and then lower the heat. Carefully lower the prepared eggs into the liquid. Pour oil over the top of the water. Cover the pot and simmer for at least an hour--or longer, for a deeper color. Check the color of the eggs periodically. If you want to make huevos haminados, or simply want an intense color, you should simmer for 3 or 4 hours and/or leave the eggs overnight in the pot of onion skins and water.
Alternative method, with eggs and dye prepared separately: Hard cook the eggs and let cool to room temperature. Add decorations and prepare as above. Next, prepare the dye. Boil onion skins in an equal amount of water for about 15 minutes. Strain the liquid. Add 1 tablespoon of vinegar for each cup of liquid. Carefully submerge the prepared eggs in the warm dye. Let eggs and dye cool to room temperature, then refrigerate overnight.
Final Step: When you like the color of the eggs (and when they are cool!) carefully remove them from the pot. Unwrap, rinse, and let drain. When dry, rub with oil to provide a nice sheen. Enjoy!